
Making Triss Witcher 3 DLC
- Chibi Bara
- Jan 11, 2023
- 13 min read
The year is 2020 and I have finally caved and decided to make the DLC gown for Triss from the Witcher 3. This would end up being my 3rd version of her! (Strap in its a long one!)
In January I was telling myself no, don't make the gown make her Witcher 2 outfit instead... So I started along in making that, along with a friends Yennifer cosplay. But I still wasn't convinced it was the Triss I really wanted to make after starting it. In February 2020 my husband and I went to Costa Rica for our honey moon. We got to enjoy our time away in the sun, while I read the first of Witcher books on the beach. Once home I resumed my cos-planning for the year and played with the idea of the dress only after I finished what I started already.
When we returned home from vacation in early March 2020, the world was slowly spiraling into lockdowns and supply chain issues with the COVID 19 pandemic. I had 3 months forced off work starting March 20 th because of shut downs for non-essential services.( I work in healthcare and we went back in June) Which sucked but I damn well took advantage to sew during it!
I finished Triss's Witcher 2 version somewhere in there along with a few other cosplays for myself and friends. But it wasn't what my brain wanted to be making. I had to get my hands on the material and make her gown. The need was still there but my brain only wanted to do it if I "fixed" her design a little. As in bling it out more and give her a nice train. But first I had to finish my other cosplays that I started. I needed to get my 1/2 done projects out of the way while I searched for her material. Let me tell you.
The hunt for Triss's DLC material was not an easy one at the time.
Time stamp: 6 months.
Start date: Dec 2020
Finish Date: June 2021
The reference:

Material:
After a ton of searching and research, I found my materials and I will compile them here:
-Green floral scroll silk material on etsy. 9m
-Gold Trim for the skirt and sleeves were from ali express
-The Gold satin material for the vines and trim was from my stash- from fabric.com originally. (Which sadly no longer exists) 6m ish was on hand.
-Lining peacock green dupioni silk off etsy 9m
-Red silk sleeve lining, off etsy. 2m
- Brown under sleeve fabric from the stash, originally from fabricland. I had about 1.5 m kicking around
- Brown boot and purse pleather was in my friends stash (bless you @binrand)
-Shoes I found at the local thriftstore (lucky me!)
-White knife pleated chiffon was off ebay and I doubled it to make it less sheer. 3m
-Wig was from Arda - Matilda lace front in rust red
-My gems and beads/ crystals were also from ali express.
- Gold sequin trim off aliexpress (spool of 10 m)
- Belt buckle 3d file I bought off an artist on art station Rebecca Tomasoni who was kind enough to sell me her design.
-Rosettes and necklace leaves were off of thingiverse for free.
-I made my leather belt with the help of a good friend crash coursing me in leather work in a day! (Thanks E! ) leather from Tandy leather donated to my cause from E.
-the crap ton of stabilizer an Heat n bond was from my local fabricland along with a ton of gold thread.
The Dress:
I started off by mocking up the dress pattern in early Dec 2020. I also started ordering my first batch of fabrics in Nov. (green dupioni silk, white chiffon and gold trims) I used old bed sheets and cotton scraps for the mock up.
This took some time and finagling to get it to sit right. Of course my cats helped me through this entire process.


I had originally ordered the 9m of dupioni peacock green silk to use for her dress that November and I was going to paint the floral on myself with Lumiere fabric paints. My paint test idea for the floral pattern had failed on the original fabric and it just wouldn't look right. After more hunting I finally found the green floral silk I ended up with! The dupioni silk then became the most expensive lining I have ever used. But its soooo pretty.
Materials:


With the mock done and the fabric still in the mail, I started on her white skirt first with the motivation to get off my butt to craft from my friend Suzie in our discord chat.
*Fun fact: Our discord chat was formed from mutual's to keep us company and hang out during the lockdowns! We would just sign on and all pop in and out to hang during the day. We had great crafting motivation together! I have made some good friends through this little group and they are all super talented! The group has def. grown since the pandemic but I'm glad to know everyone in it! It really helped us all get through.
I started by patterning the skirt out in 3 pieces using paper to help me judge the overlap. I doubled up my chiffon and cut the pieces out. I decided I was going to use elastic as my waist band so that she would fit me even with any weight fluctuations and be more comfy to wear. I made the waist band, surging my edges together and rolling it over and sewing a tube for the elastic. I stitched the rest of the skirt pieces together and hemmed them. I sewed the trim to the edges.

The trim is actually two triangle pieces doubled to look like squares. I added crystal beading in the center of each one.

After the skirt was done, my next project was the under sleeves.
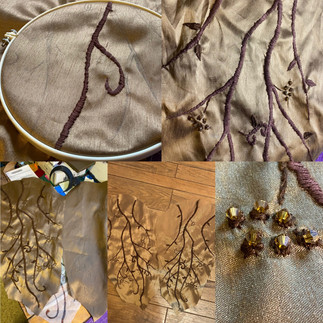
I drafted a patten from paper and drew out the vine designs. I was on the fence on weather I wanted to paint the designs on or actually try embroidering them. I did a test and I just had to keep with the embroidery. At the time I had no deadline and I was trying to be as accurate as I could. I learned how to embroider satin stitch and leaf designs. I remember working on this around x- mas to give me something to do for the holidays. Each sleeve took me about 3 evening sessions to embroider and bead. I also thought of the idea to add buttons ( like her reg. witcher 3 gloves had) down the arm because what's more bling right? Also to help get that snug fit around the wrist with a non stretch fabric. Over all I am pleased with how pretty they turned out!
I ended up making 3 sleeves for this because I ran out of embroidery floss after the first and could not match the browns again. So the first sleeve became practice and I started over.
sleeve WIP :


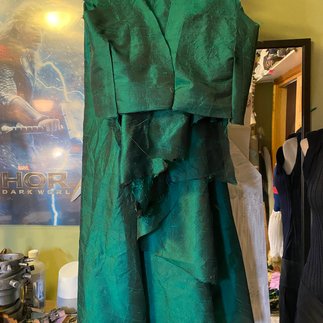
My green silk came in some time around Feb. I worked up the courage to cut into it around March 2021 I cut out my pattern from silk and cotton. I then had to flatline all pieces together before I could sew with it.
The green silk:
Cutting it and the cotton out to flatline:

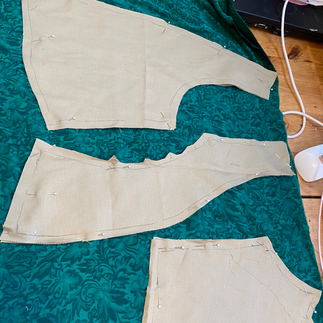


Once the basic dress was sewn together in separate top and bottom halves, leaving the sleeves off for now, I could now start on the vine applique.


I started by drawing her vine design out on the mock up directly with heat erase pens (so I could correct things) and then tracing it all onto tracing paper with a sharpie. As you can see I ended up redoing my top mock up because I used sharpie first and messed up. So I re made the top and tweaked it a little. Then re did the vines.


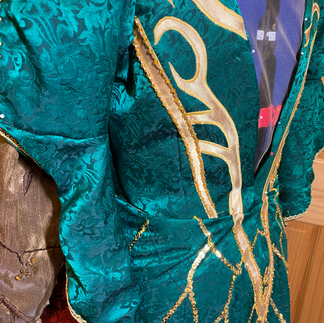
I transferred the vine design from the tracing paper over to one paper side of the heat n bond ( be sure to mirror it for the other side and label each piece) and ironed the heat n bond onto my gold satin. Then I cut all the vines out of the gold. My vines were now ready to be pinned in place on the dress and ironed on. I did this with the thick gold trim band at the same time. I made the mistake of leaving the heat n bond paper backing on when I pinned most of the vines down for placement so I had to re do this step to remove the paper backing first.


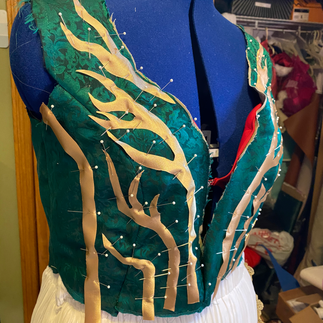


Once the vines and trim was ironed on to the dress and in place I satin stitched around every single edge of the vines and gold band. I added a tear away stabilizer under the cotton/silk pieces so that my machine could work with the material better. Patience is a must here. This is tedious work. I started with the top, and worked my way to the skirt as a separate piece. This way I could line things up better.


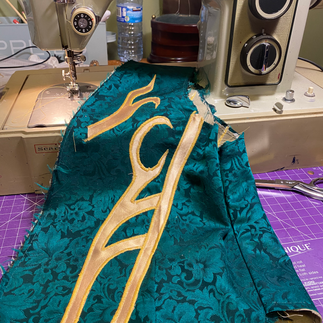


Now that the vines were satin stitched on to my 2 pieces , I satin stitched the trim borders on around the bottom of the dress above the vines and the V in the lower back. This gave me a "frame" on which I could pattern out the gold squiggly lines on the back of the dress. I used chalk and drew the lines on free hand.
Next was to attach the gold sequins in that pattern on the back of the dress.
I got a roll of sequins and pinned them all in place, sewing them down every time a full line or two were pinned. Attaching this took forever and so did sewing the single strands of sequins down into the pattern on the back. I used a wide zig zag stitch on my machine. Over all I love how sparkly it is. I chose sequins because I 100% wanted that bling but also because beading would have been HEAVY, my dress wouldn't flow as much as I'd like and also it was just way too much time and effort.


Once the sequins were attached, the dress was almost ready to partly assemble. I just had to bead my trim edges with the crystals I decided to put on. I spent hours beading the strait trims, but they turned out so sparkly I'm glad I did! My favourite detail on the dress are the crystals on these trims, and on the under sleeve's " flowers".


I attached the lined sleeves to the bodice first, and finished off the elbow trim detail and edging along the sleeve border. I added my buttons and button closures down the under sleeves ( I had to dye cream elastic loop trim brown to match her sleeves better) and I sewed them all to the dress bodice. Once the bodice and sleeves were assembled I checked the fit. I added a panel of action mesh in nude to the back of the top to keep the shoulders from falling off while wearing it. ( for fittings I had a ballet strap attached but decided on the sheer back instead.) This is a very plungey design and the front and the back can't both be the deep V shapes as they are, without a wardrobe malfunction. So I added the panel for support.


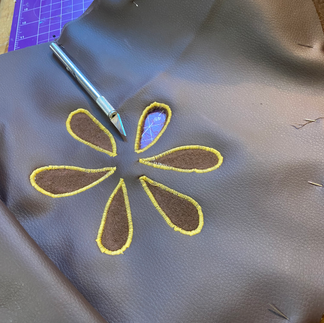
Next up was to work on all the leaves. I ended up satin stitching the leaf shape on my gold satin in a quilters hoop with a layer of stabilizer in the middle to give them strength. I then hand beaded around all the leaves with gold seed beads. Once the beading was finished ( it took a WHILE off and on) I added heat n bond once again to the back of the satin the leaves were sewn into and cut out the leaf shapes from the fabric.


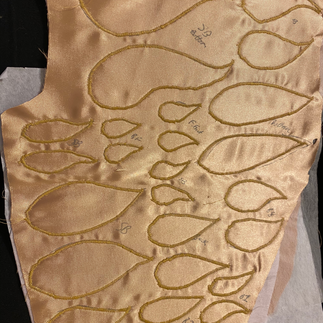


satin stitching the leaves:
I ironed them down to hold them in place to be hand sewn on to the dress. This detail took the longest amount of time.

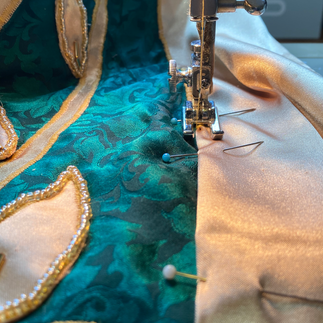
I could now sew the top to the dress train, lining up all my embroidery. Once attached I went in and touched up any gaps in beading where I had to leave seam allowance to sew the two pieces together with my crystals.
Once the beading was all done I started on making the dress lining. I cut it out and let it hang for a couple days. If there was any stretch/sag in material it would happen before I sewed with it.


I hadn't yet attached the bottom gold hem trim yet because it needs to wrap around the lining. I satin stitched the top of the gold edging on and added its crystal beading before I lined it. I lined the dress, and finished the gold trim off by hand inside.


To keep the dress on me while wearing it, I sewed velcro strips onto the inner lining of the bust of the dress. I then had * velcro I sewed onto stick on bra cups to keep it in place. I also have a hook and loop at the waist to keep it closed under the belt.

* I later modded the sticky bra to a nude string bikini top with clear straps with velcro on the outside, this shows a small clear strap under the bust that's easily edited out in pictures. I also added little shoulder loops that hook around the neck straps to keep the shoulders in place better. My original way worked very well but as the day went on I found the cups liked to loose stickyness or migrate a little with the weight of the dress. The opening tended to just get bigger as the day went on and I wanted to feel more secure for walking around conventions.
The accessories:
Belt:
I made her leather belt using a veg tan leather strip and hand tooled it. I also stained it when it was finished, then weathered it with black angelus paints. This took me about 3 days to finish. It was now con crunch time as I had booked a photo shoot and needed to hustle.


How I made the grooves in my belt-* Video has hammering sounds*
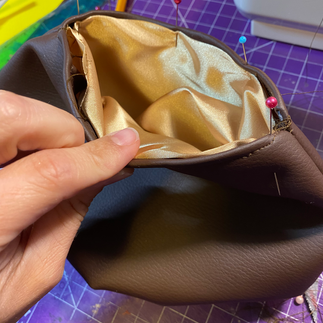
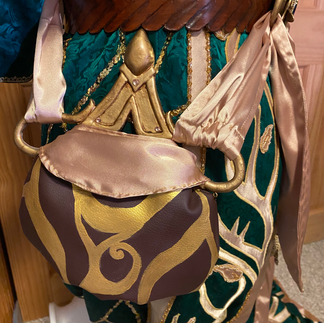
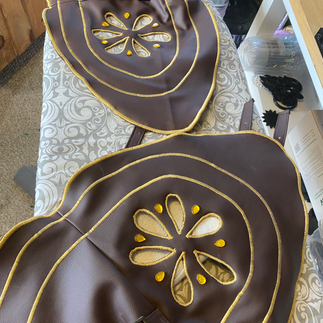
Purse:
I made her hip purse from worbla and pleather, and used lumier gold paint for the design. I made it close with a magnet, and sized it to fit my cellphone and a few small things. I added snaps to the satin belt that holds it onto her leather belt to make it easier to remove. There are D rings underneath the leather belt that loop the gold satin in place. I made two pouches before I got the design right. I started with a paper pattern and used foam and worbla to make the handle of the purse. I added a gold lining from my vine scraps.


3D printed bits:
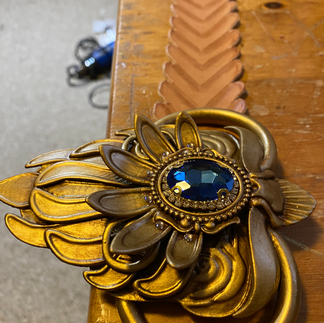
I 3 D printed her buckle and rosettes and did the rosettes again in march when my resin printer came in to get better detail that my FDM just couldn't do. I finished them with filler primer, sanding and primed in black. I used rustoleum gold metallic paint to finish them off and weathered with brown acrylic. I glued some bling in and pins to the back they were done! I also 3D modeled the two hair beads but being new to this, I couldn't figure out how to add the carving on the computer. so I wood burned them in by hand. I finished them the same way but painted them silver.
The buckle was a purchased file off an artist on Art station-Rebecca Tomasoni
It printed beautifully.


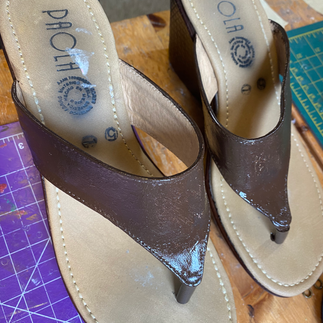
Footwear:
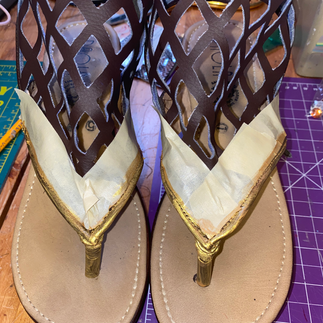
For the footwear and leg wraps , I modded the flipflop wedges I got at the thrift store, and remade the top to look like her leather with cut outs. I ripped off the gems that were on them, and painted the thong part brown with angelus leather paint. I made a pattern of my foot and leg using masking tape, and cut it out. I made a leather piece in the right shape for the top of my foot and made a lattice design on the wrong side of the fabric. I cut the holes out with a craft knife. I sewed the lattice piece on carefully where I could with my poor sewing machine, and glued the rest with E6000. I added the gold with Lumiere gold paint.


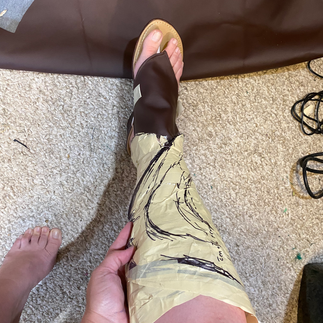


I then took the pattern of my leg to see how the wraps should go. I had to enlist the help of my husband to hold things in place while I tested the closure of the wrap when I was patterning to make sure it sat right.

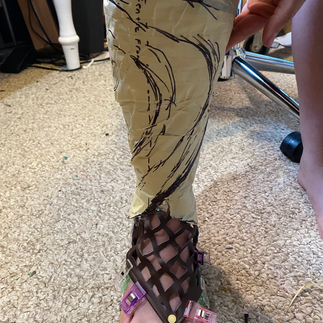


I ended up making them in 2 pieces with a center back seam. I cut out my pieces, and sewed them together in the back. Then I did a fit test, tweaking as I went. I lined the pleather in brown felt for comfort so I repeated this step with the felt. I lined everything up and pinned it together to draw the side flower pattern on in chalk. I sewed velcro closures onto the felt before it was attached and to the pleather. Testing the fit as I went. Once things fit, I sewed the lining and pleather together then satin stitched the edges of the wraps. I did another fit test and satin stitched along the flower cut out in gold as well. I used a craft knife to cut out the details after. I added the extra borders with satin stitch and I added a few bits of gemstone bling here too. I had some salvaged buckles from old boots kicking around and I used them for the side closures. I actually really like how her boots came out in the end as I was so worried they would not sit right.


Hair clip
This one was a combo of 3d printing and worbla. I re used her sleeve rosette test print as the center, and built off it with black worbla. I started with a paper pattern to get the size and shape down. I made the leaves in black worbla doubled up and started sculpting.
When it all fit together correctly, I glued the 3D printed rosette down with E6000 and let it dry. I used filler primer and gold like I did her belt buckle. Finished it with the larger gem and some crystals. There's a patch of felt on the back that I sewed a clip into to position it as needed.


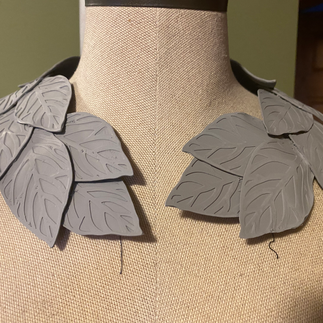
Necklace- I printed the leaves on my FDM printer from a free thingiverse file I liked. I used my dress form to get an idea of placement. I gently heated them each with the heat gun and pinned them around the neck of my mannequin to cool in shape. This took a little bit of fiddling, and a lot of carefulness in heating. Too much and they melt, not enough and they don't curl. I'm glad I had printed extra. I glued the leaves together with E6000 and finished the back of the necklace with a little bit of worbla to attach the two sides together in the middle. I used filler primer, sanding and spray paint again to finish them , antiquing with brown acrylic like her belt buckle.
I 3D printed her tiara on the FDM printer to keep it flexible. I had originally made it from pleather and I planned to paint gold but I didn't like the look and re did it. I secured it with chain and fishhook earrings to slide into my wig grip before I put the wig on.


The wig:
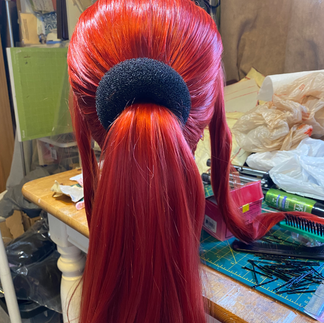
Arda Matilida wig in Rust Red.
I started with pulling the wig back into a ponytail, and adding a sock bun form. I braided sections and pinned everything into the center. just moving things to look as close as I could get it to the shape she has in the game. I used G2B hairspray to hold everything in place. Triss has been restyles once so far, after a horse shoot where it got frizzy. I made the whole bun a little tighter the second time.


Triss took me around 6 months to complete in total and her debut was a photoshoot in Guildwood park with elemental photo design! Mt cosplay has been on the cover of Cosplay double Magazine and in 2022 Cosplay Alliance magazine as a Christmas version! :)

edit by @mandapanda cosplay

There are more build pics and final pics on my instagram - @chibi_bara_cosplay feel free to message me there if you have any questions!
I hope this helped anyone who was interested in making the dress! Or at least anyone who likes to look at progress pictures and the process as a whole! Thanks for reading! If you found this helpful please tag me in the credits so that more people can find this page!


Comments