
Making Aeriths Wallmarket gown from Final Fantasy 7 remake
- Chibi Bara
- Jun 12, 2023
- 7 min read
Updated: Jul 8, 2023
Start: Nov. 2022
Finish: March 4th 2023
Hours: 103
Material: fabricland, stash(lining) and lens mill store for the red cording. Heres compairable fabric on amazon! You can use my affiliate link here! https://amzn.to/3PLK1Ge
Beads/ crystals: ali express and amazon here is my affiliate link for the ted seed beads I got on Amazon! https://amzn.to/3JQEVVr
Large gold star charms: Michael's craft
Small sparkly stars and gold chain: ali express but theres some compairable ones on amazon without the gems here: https://amzn.to/44jdonS
Wig: epic cosplay "Urania" in light brown and 1 long ponytail clip for extensions.
shoes: ali express
Wide ribbon - michaels craft (sewn in 1/2)
Pointsettas- dollartree and dollaramma

Deciding to Make Aeriths red gown from the wallmarket chapter in Final Fantasy 7 remake happened some time in 2020. I was playing the game and beat all the quests/tasks that lead up to Aerith stepping into her cut scene in the stunning red number. I thought oh! This could be really pretty to make! Then I saw her hair and humbled myself. Saying maaaaybe not right now. Fast forward a couple years and here I am! Learning some fun new things on this gown that I definitely over complicated!
I decided to bling this one out a little more and based my design on her action figure.
I started off by researching in game references and the play arts figure references. I also looked to see what other cosplayers had done. I came across the same velvet type dress from online costume shops over and over again. There were a few amazing cosplayers who did a great job making theirs but it wasn't quite how I envisioned making mine.
I started off by mocking out the red dress skirts to get something with a little bit more flair
From a wedding dress pattern I had on hand. Then I drafted the top bodice half of it custom on top of that, joining the two parts at the waist to make the base red dress. I patterned these out on old bed sheets to check the fit.


I played with the fit a bit in this dress trying to get things to sit right. In the end had to raise up the back of the dress a bit more than the reference because I didn't want to add clear straps to the dress like most of the store bought ones had. I played with the idea of action mesh but figured just raising it up a little would also work because her big butt bow would be there to hide it.


Next up I made a bodice for the black under layer of her top. I made a paper pattern from scratch and then made a cotton layer with boning channels. I used this for the middle layer of the bodice and went ahead with adding the lining and fashion fabric. This layer was to add support and structure to the top of the dress since its strapless. I will also be adding cups into this layer. I added a waist stay elastic that does up with a bra closure, like you would see in bigger wedding dresses. My attempt to have some of the weight of the dress supported by this waist stay and keep my dress from sliding down.


Once the base was made I hand tacked in the back zipper to make fittings a bit easier. I sat it on my dress form and started patterning out her dress appliqué details. The two little belt ones and the bodice "lace" ones. I was torn here on just buying some pre made lace ones and dying them or trying to make her pattern off the figure. I chose to do the figure telling myself if it failed then I'd do it the other way.
I had just enough burgundy cotton sateen in my stash that was perfect. I started by tracing out the dress's neckline on tracing paper. Drawing the flower designs as best I could from the references. I then cut the outline of this out on my burgundy fabric. I satin stitched around the edges. I used my tracing paper pattern to draw the flower like designs on. I used a heat erase gel pen for this step. (Whiiicccch I recommend testing first cuz my black pen turned my fabric white instead of erasing... oops. ) once these designs were done I planned on beading all the detail in.


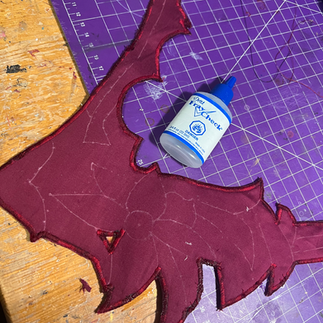


To make her belt designs I wrapped my dressform in cling wrap and masking tape and begun patterning them out. I cut them out and used these as exact patterns for the fabric versions. Once they were all cut out, I backed them in med. weight interfacing to help my machine out. ( otherwise it would eat my fabric) and to add stabilization to support the beading. I satin stitched around all the edges to add my beading to later, and repeated the inner lines with the heat erase gel pen.


I used a strip of red satin backed in interfacing and surged the edges. I attached this in the shape of the red dress's V shaped neckline to add strength to support the beading and give it a nice clean crisp edge.


I also patterned and made the little red satin V shaped design with quilted lines at the bottom of the red dress neckline and tacked it onto the dress afterwards. I ended up doing 3
Vesions of these before I liked it.


Beading the applique took me some time, (41 hrs) but was a pretty easy task. I'm loving how sparkly its turnd out.


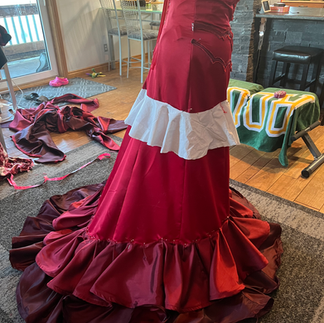
I hemmed the red dress and finished off the side slit's edge. I started to make the flounces.
this was a little tricky for me as I was originally thinking of making gathered ruffles vs a flounce to save fabric but ultimately decided it would not give me the look I wanted. SO onto making 6 "circle skirts" and learning how to apply horse hair crin to the edging.
I started by spacing out where the rows of ruffles would sit. then I had to figure out how big the circumference needed to be for each ruffle. I measured out all 6 of these lengths, and then divided by 12 to get the radius.
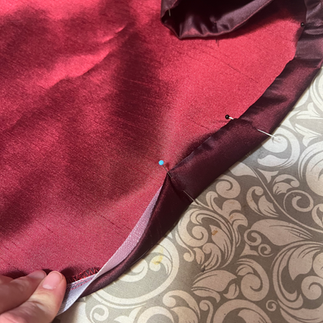
I used a double circle skit and one single circle skirt for the bottom 2 ruffles. and I used just double circle skirts for the top 4. I used about 6m of red bridal satin for the top 4 ruffles.
I surged the circle skirts together for each ruffle and then finished the top and bottom edges of each with the serger as well. Then I sewed on the horse hair braid, ironed them under and roll hemmed them up again. This way when they flip up you wouldn't see the white horse hair braid.
I spent time pinning them onto the dress, the bottom one was 3 circle skirts and I gathered and pined them on the dress to get some more fullness. I had to do this about 3x before I was happy with it. I sewed it on the dress, and started with the next one up which was also 3 skirts and needed to be gathered as well. I re did it a couple times till things started sitting right. I sewed it on and worked my way up the dress in the same way. The other flounces were not needing the gathering as the flounce hung fine being 2 circle skirts and fit the circumference nicely.
I capped the top ruffle with a braided cording which I'm deciding if I want to add more bling/ beading too.
With the flounces all attached the beading completion was the next step before I could get a proper fitting and weight test done.


Once the beading was done I fitted the dress, put the zipper in and attached the beaded applique by hand.


Next I stated on the lining for the gown. I made the skirts from the waist down and connected it inside to the bodice. I hand sewed around the zippper.


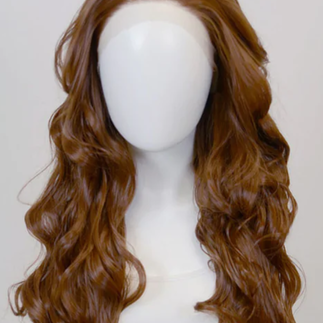
wig:
I purchased a "Urania" in light brown from epic cosplay. Along with 1 long ponytail clip.
I curled and spliced in extensions underneath the wig so when its pulled back it will look nice in a ponytail.


I made extensions 3 wefts thick and sewed them to little clips, also pre curling them with a hair straitner and steam. (Watch your temps with this! You dont want it to melt. Most wigs have a temp guide for the fibres)
I started with straitining the top layers that needed to lay flat on the wig and sectioned out the bangs.
I pulled it back into a 1/2 ponytail at the top and then brought some side pieces up. Each section got there own elastic band. Due to the sheer weight of this pony, I decided to leave the back down underneath. This took some weight off the back and less pulling at the front. I also sewed in wig clips into the inside of the wig cap to help manage the weight.
I used a sock bun form over the base pony and started pinnning it in. I then wraped ponytail hair over this and clipped in my extensions to hide the form. From there I tried to train the wigs curls to all go in one direction to make up her 3 ponytails at the back. I used wirered ribbon and wraped each section in that, weaving it through parts to hold better.
The flowers I grabbed at dollarstores around x-mas and glued little clips to them with E6000. I trimmed one down small to match her little one at the back.


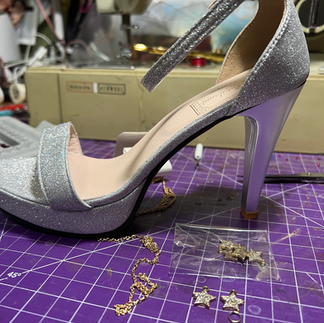
shoes:
I bought the shoes off ali express and I added the star charms on chains.
I am also found a lower pair for cons and im keeping my high ones for photo shoots.


Braceletts:
I used white worbla scraps to make her arm cuff and painted it gold.
Her black and red set, I used matching beads for the red as in her applique, added the same flat charms her necklace had. The black is a string of suede cord with a matching star charm. I didnt get a very clear ref immage on these so I just made what looked close enough to the game to me and tied in the star bling.
Extras: I purchased yellow lillys for her prop and I also made a matching red purse!


Comments